

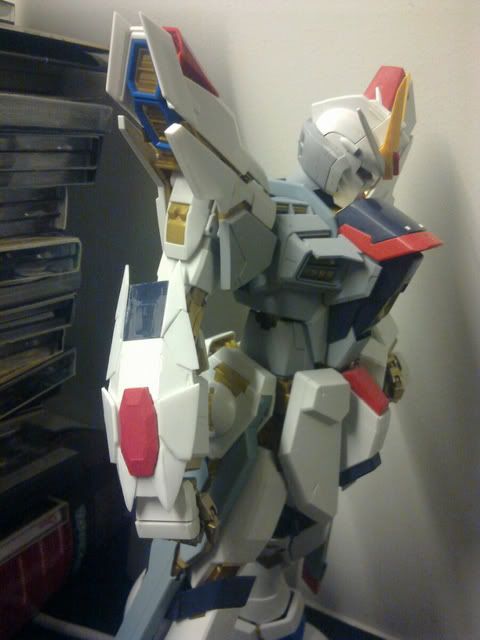
This is a build from last year, whose photoshoot is long overdue lol. I don't really own it per se - it resides at HAW - as this was done as a display piece for last year's GBWC 2011. Nevertheless, I consider it as my breakthrough piece, even though it was never entered for any compy. Learnt a lot of techniques on this build, thanks to invaluable advice of Toymaker. The goal was to detail up the PG SF, but remain faithful to the original design and colour scheme. I completed the main body and had to move on to my GBWC entry, so Sam from HAG/HAW finished up the wings. Credit to Toymaker for the pics.
First, some WIPs for a better picture of the modifications done on this baby:
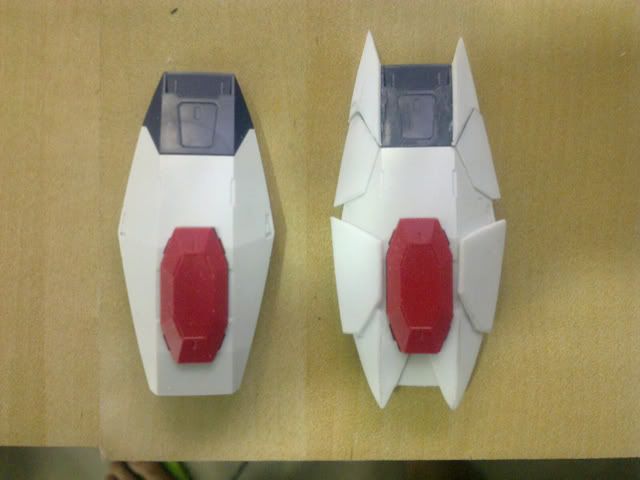
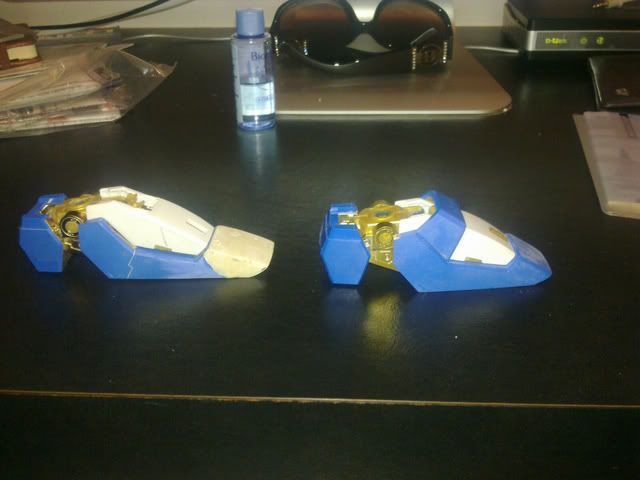
Comparison: Before-After:


39 comments:
I'm working on my PG Strike Freedom, and I'm trying to copy some of your mods... I hope I can make it decent. ^^;
Cool bro! All the best. ;) Feel free to ask me if you need any help with tips or recommendations.
will do so... you can see my thread at SGGS forum, I've finished the feet extension mod, and I will try adding some screw bits on the feet (not finished yet, still planning).
gonna take this project on slowly, since I have almost 3 months of vacation..
Hey Waylander
Great work on the freedom.. Could you tell me what brand of paint did you use for the gold parts. It's an awesome color.
Thanks! :) Gold is Gaia Notes series Starbright Gold. Hope this helps.
wow doing these mods are much more difficult than I expected... XD
I'm currently working on the feet, which turned out pretty good (the feet extension), and I added some pla-plates, screw bits, trimmed some parts to reveal the gold... who knows how long it will take to finish this kit. =P
anyway, did you paint the plated parts? if you did, did you strip the plating first?
Slowly does it. :) Plated parts, nope. I didn't strip. Just painted over them with a gloss black base, then gold over. It's not worth the effort to strip plated parts....too much trouble for too little result. That's my opinion anw :P
haha, I planned to do this kit in almost 3 months until the next semester begins.. should be more than enough to work on this leisurely.
thanks for the answer! =)
Got a question for you man... So what the steps of doing panel lining, shadow decal, and top coat? Which one did you do first and which one goes last?
Panel lining is done in the earliest stages, when you're modding your kit and adding whatever you want to add onto it before painting. Painting comes after you're done with all the physical detailing. 'Cos once you paint, you can't un-paint it to scribe an extra panel line or stick on another part, unless you wanna soak the model in thinner and kill it. Makes sense? :) After painting, a layer of clear gloss top coat is needed to make sure the surface is smooth so you can apply your decals. After the decals have been applied, you spray on another layer of clear top coat (flat or gloss, that's up to you) to seal in those decals. And you're done. Hope this helps.
my PG SF is completed... it's similar to your PG SF and Keita's MG SF Evo, lol. but I added less details.
you can check it here http://www.sggunplasociety.com/t1030-pg-strike-freedom-completed-model
Nice work bro! I've seen it. Congrats on your build :). I'm glad mine managed to serve as reference. Keep me posted on your next one!
thanks... my paint job is nowhere near your level, but I hope the next one would be better ^^;
I think my next project would be MSB's Freedom resin conversion. (next year)
hmm , just wanna ask , what type of top coating u use for your PG strike freedom?
Just normal flat coat bro. But no coating for the gold internals cos metallics lose their sheen if you apply any coat.
Hey Waylander,
Your Strike Freedom look amazing. Especially the gold part and the shadowing.
Could you please help me with how you paint your gundam. I'm still new with painting gundam. Do you sanding and used premier on your gundam first before painting it? or just spray/ paint it directly on the runner?
Thank you.
HK
Hi HK, yes I sand every part and spray primer on them first before painting. I don't advise painting directly on runner. You should cut out the pieces first. Hope this helps :)
Thanks for the reply Waylander. It help me alot.
Wow Strike Freedom PG have a lot of runner. When you said sand/primer&paint every part, do you included the joint, finger or small parts too? Wouldnt it cause stiffness in the joint? How many layers of paint do you usually do?
Hi HK, yup I sand every part. No, you don't have to sand the joints. You sand what's called the 'nubs' - the point where you cut the part off the runner. Because there will be an ugly mark there that you have to get rid of, otherwise it won't look good after painting. Steps:
-Cut parts off runner
-Sand down nubs until smooth
-Spray primer
-Spray colour. If you want to shade, then you have to spray a dark base colour first, then a lighter colour on top for the shaded effect.
-Top coat with gloss
-Panel-lining
-Gloss top coat again to seal in panel lines
-Decaling
-Gloss coat to seal in decals
-Flat coat if you want the matte look. If you prefer gloss, then leave it at the previous step.
Hope this helps!
Hi Waylander,
You are the best. I got the main idea now. Thank you for all your help.
HK
Hi Waylander, I was wondering if you painted the entire inner frame with the gaia notes gold? Is there a need to prime first?
I noticed that you didn't paint the inner frame for the dragoons the same gold. Was that intentional?
Hi, yes i painted the inner frame with gaia notes Starbright gold. There is no need to prime, but i first spray on a base coat of gloss black before applying the gold. The black acts as a 'primer'. Black is usually used as a base coat for metallics cos it highlights the shine better, and provides depth to the colour. Because it's gloss black, it's also much smoother than primer, which contributes further to the shine. I generally do not use primer for any metallic paints, as primer roughens the surface and kills shine. For the dragoons yes I think they were painted with another tone of gold because they were done by Sam at HAG. I only completed the mecha.
Hi, For the base coat gloss black did you use gaia notes gloss black as well?
http://www.aliexpress.com/item/GAIA-Oily-Paint-Gloss-Black-Pure-Black-002-15ml/684866982.html
OR surfacer?
http://www.aliexpress.com/item/GAIA-Surfacer-Black-50ml-High-Quality-Water-Base-Coat-gaia-Putty-Series-GS-03/713550356.html
Thanks!
sorry one more thing. the metallic red on the arm armour is this one?
http://tokogundam.com/products-page/available/gaia-003-bright-red/
Any priming needed? Sorry for all the questions. First time painting and last thing I want to do is destroy the build!
Hi Waylander,
That is one beautiful kit, the paint job looks amazing. Congrats. Can't wait until I can actually afford my own PG SF and paint it as well, lol.
Ok, I have a question. What do you recommend for painting kits like these spray painting them or using an airbrush set?
Hi, definitely air-brush. Much more control and better quality paint finish. Gd luck with your new kit! :)
Thank you very much Waylander
Mr. waylander i chie from Philippine i saw your PG strike freedom mods, and i want to asked your permission if i could copy your own masterpiece. thank you sir.
Hey, after looking at your project, I am planning to one of my own. But I am going to do mods to make my MG freedom like a PG.
Good luck, Ryan!
@Chie, sorry this came so late but I didn't see your comment. Sure you may copy it. (If you haven't already) ;D
Hi Waylander, I am currently trying to do my 1st extra panel line creation kit which is a PG strike. Just wonder do you have any tips for me in the design of the panel lines? I am totally new on this and have no idea how the pattern should flow. I tried some myself but i think they are really ugly and instead f making the kit good it made it worse...lol
pls help if you got time thanks
Hi way lander, I need to know what gold u use on back pack & what base coat?
Hi waylander, I want ask how do u extend the torso of SFG?
hi waylander
i love your work, one question, after separating the shoulder amours how do u attach them? as the amour is slightly more toward the bottom.and also the torso extension how do u do it ?
Hi bro, I glue the extended armour. As for torso extension it's about finding the right segment to cut and then lengthening it with an acrylic rod.
Hi there is no sure way. You just have to keep trying and improve. General rule is to follow the "flow" of the edges and going parallel to them instead of right angles. Recommend looking at more pictures of others works
Gaia starbright gold and gloss black base
Totally awesome sir..I'm planning to customize my PG SF with LEDs (as what I have as a skill) but i'm having problems with the details to make it amazing until I saw this nice work of yours...now I have an inspiration for the design..thanks bro, more powers with your works :)
Post a Comment